Ok, so there's no duct tape, toothpicks, or bubble gum involved, but I thought it'd be helpful to document a handy way to tinker with your Raspberry Pi, even when you're almost completely lacking in the required external paraphernalia.
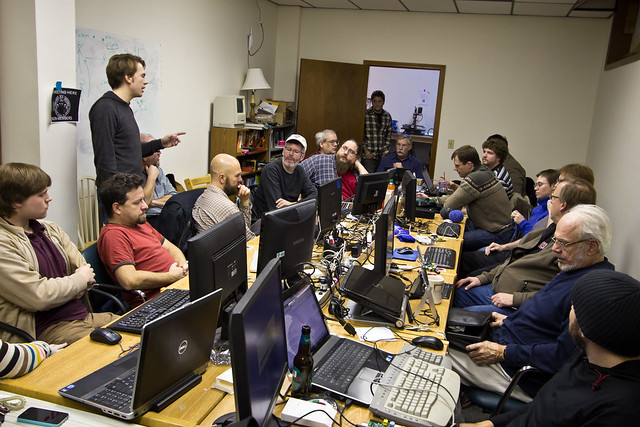
We recently had Rob Bishop from the Raspberry Pi foundation stop by Interlock and give a workshop for a couple of hours, and as we scrambled to prepare -- attempting to pull together 20 hdmi monitors, 20 usb keyboards, 20 power supplies, et cetera -- I kept thinking that it'd be nice to be able to play around with a Pi even if you've arrived unprepared for such an event. So what follows is "how to fiddle with the Pi GUI with just your laptop, an ethernet cable, and a micro USB cable". We're going to start with a freshly imaged SD card, hook it up to a Mac or Ubuntu laptop through their internet sharing capabilities, and use VNC to share the GUI over the network.

Getting Started
The first step we'll gloss over is copying a fresh Raspbian image onto an SD card. This is covered in great detail at the embedded Linux wiki, where they have plenty of information on setting up the Raspberry Pi. Go there, follow along, and insert your newly imaged card into your Pi.
Internet Sharing
Next, we're going to prep our laptop to share its internet connection with the Pi. I know nothing about Windows, but on Ubuntu and Mac OSX, there are easy ways to share your wifi connection with any computers that are hooked up to your ethernet port. We'll take these one OS at a time:
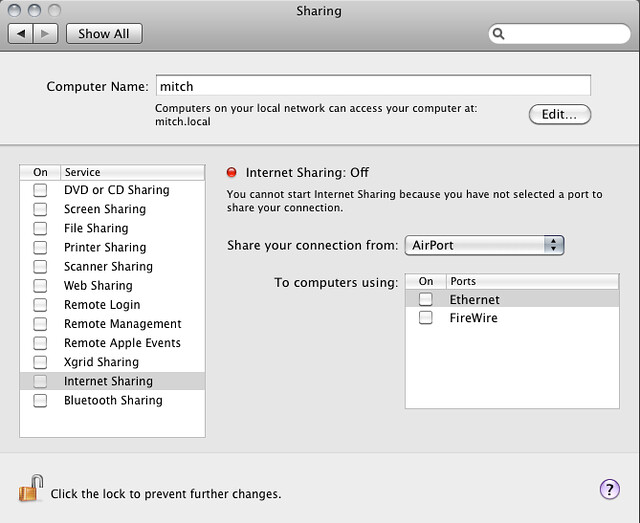
Assuming your Mac is connected to a wireless access point, open up the "Sharing" control panel in System Preferences. Click on the "Internet Sharing" option, which is probably grayed out at this point. Choose "Ethernet" as the port you'll share your internet connection out of, and then turn on Internet Sharing by clicking its checkbox, which should now be clickable. Done.
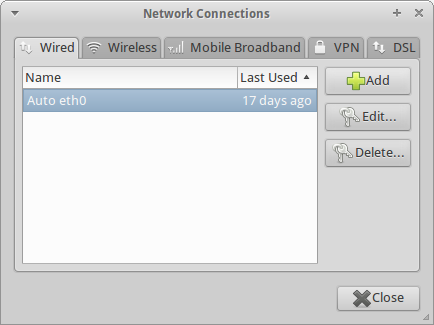
This step is equally easy on Ubuntu (and its variants... I use Xubuntu). Open up the "Network Connections" system preferences. You'll see something like the above screenshot. Click the big "+ Add" button.
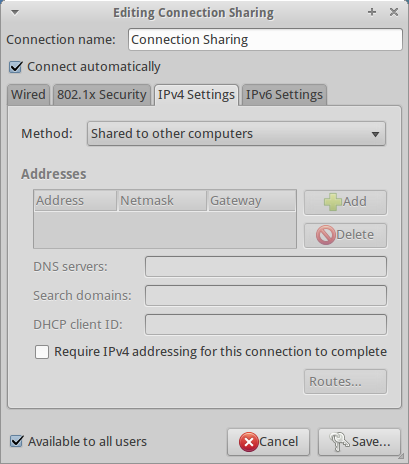
You'll be confronted with something like the above. Name this new connection something logical. "Connection Sharing" works for my brain. Click over to the "IPv4" tab and select "Shared to other computers" from the "method" dropdown. Some people have reported problems with IPv6 at this point, so click over to that tab and select "Ignore" in the same dropdown. Save the connection. Carry on.
Plugging In
Now we should be back on the same page for both OSes. Find the shortest ethernet cable you can and plug your Pi into your laptop's ethernet port. Nothing should happen. Plug the USB cable into your laptop, and then into the micro USB port on the Pi. Before doing so, reflect upon the fact that the Pi foundation does not recommend you power your Pi off of a computer's USB port. Your computer might not be able to supply enough power, and/or might burst into flames. I've not had any such problems, but if your Pi is acting flaky, or if you're planning on plugging any USB peripherals into the Pi, you may want to sacrifice MacGyver points and portability in favor of a wall outlet.
Sleuthing IPs
Ok. We're plugged in with internet tubes and power. Your Pi should be booting up and making happy blinkies on its status LEDs. After a short while, it's safe to assume that it has fully booted and grabbed an IP address from your laptop. Hooray! Open up a terminal and perform the following incantations to find out what address it was assigned.
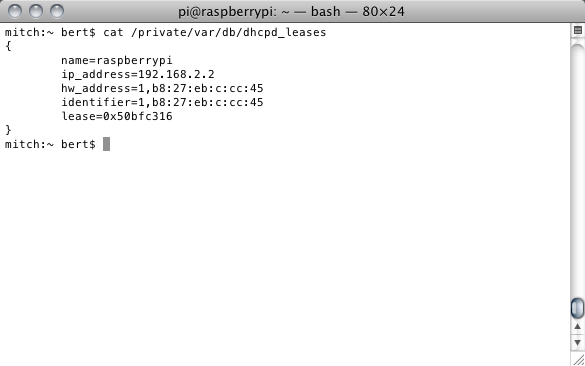
On the Mac, cat /private/var/db/dhcpd_leases should pop up a block of text with the desired info. Above, we got an address of 192.168.2.2. That's probably pretty standard.
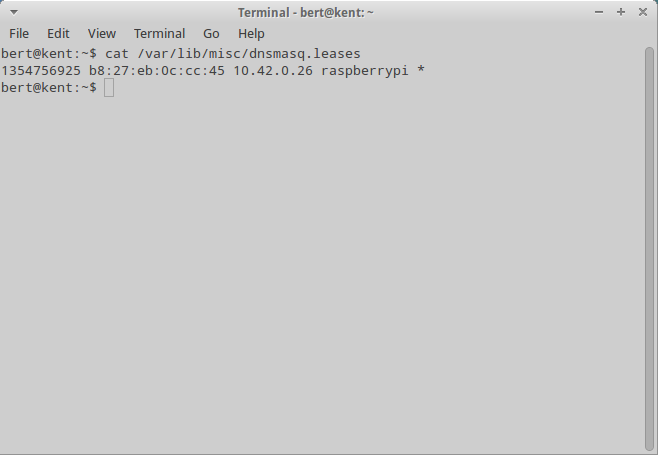
On Ubuntu Linux, cat /var/lib/misc/dnsmasq.leases will get you the same info. In this case, our IP is 10.42.0.26.
SSH, and Setting Up a VNC Server
Just a few more steps. We need to SSH into the Pi. That is, we need to connect to a command shell on the Pi so we can install a few things to get our display up and running.
ssh pi@x.x.x.x
Substitute the IP you found previously for all the x.x.x.x mayhem at the end there. It should connect and ask you for the default password, which is "raspberry". Now install the vnc server. This is what will transmit the desktop environment to your laptop:
apt-get install tightvncserver
Run the VNC server once, and it will ask you to set a password:
vncserver
Set and remember a password when it prompts you. I just used "raspberry" again. I'm creative like that. Now we'll run the VNC server for real:
vncserver :1
The ":1" is the display number. This is necessary because you could serve multiple virtual displays off of one computer. But lets not get ahead of ourselves.
Installing a VNC Client
We're now ready to install the VNC client on our laptop and connect to the Pi's GUI. Chicken of the VNC is a popular Mac client. Download and install that as per normal. On Ubuntu, Vinagre is probably the most popular client. apt-get install vinagre should get it installed without a problem.
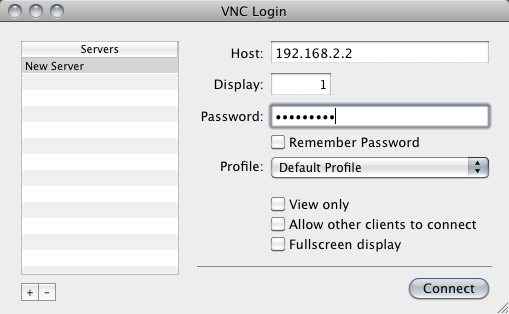
Almost there. Above is the Chicken of the VNC connection dialog. Fill in the IP address you found previously, and the "1" display number and password. Click connect and you should be up and running! On Ubuntu, the command vinagre x.x.x.x:1 will do the same thing. Yay! You're done. Celebrate your hard work and dedication while admiring your glorious accomplishment:
Extra Credit
Fellow Interlock member BleuLlama suggested a way to make this process a bit easier the second time around. Rather than hunting down the Pi's IP address (which is admittedly not very difficult to do), we can use Apple's Bonjour protocol (aka ZeroConf) to have the Pi announce itself to the network. I found a good writeup on how to do this, plus how to get the VNC server to start automatically on boot. Check it out at Pat Galea's blog. You can ignore the part about installing Netatalk unless you care about Mac file sharing.
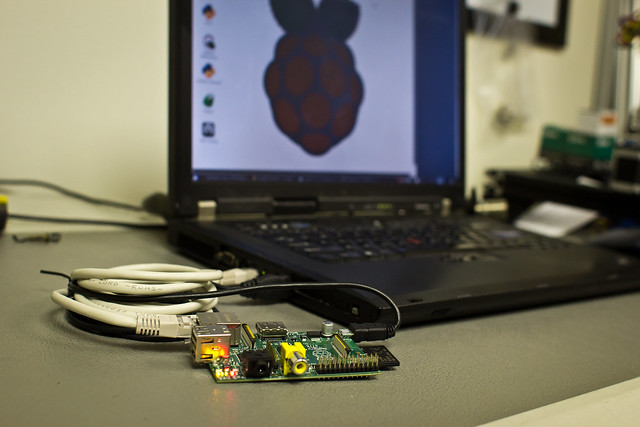
When you're done with your extra credit, you'll have a Pi that you can plug into your ethernet and USB ports, wait a minute or two, and it'll pop up automatically in Chicken of the VNC or Vinagre (or any Bonjour enabled VNC client, of course).